Complete Developer's Manual: Building Custom Modules in Odoo

About This Guide
This guide provides a beginner-friendly, step-by-step introduction to building custom applications in Odoo from scratch. Using a hospital management system as a practical example, it walks you through structuring your app, storing custom data, creating user-friendly screens, and making updates safely—all structured so anyone can follow along and build custom features easily.
What You Will Learn
App Organization: How to set up clean folder structures and manage how your app files load together.
Data & Screens: How to create custom fields to store information, build clean lists and detailed views, and manage record statuses.
Security & Access: How to control who can view, edit, or create records within your app.
App Updates: How to properly install, update, and apply changes to your custom Odoo apps.
Prerequisites: Finding Your Odoo Server & Custom Addons Directory
Before writing code, you need to know where Odoo lives on your computer and where to place your custom code so Odoo can discover it.
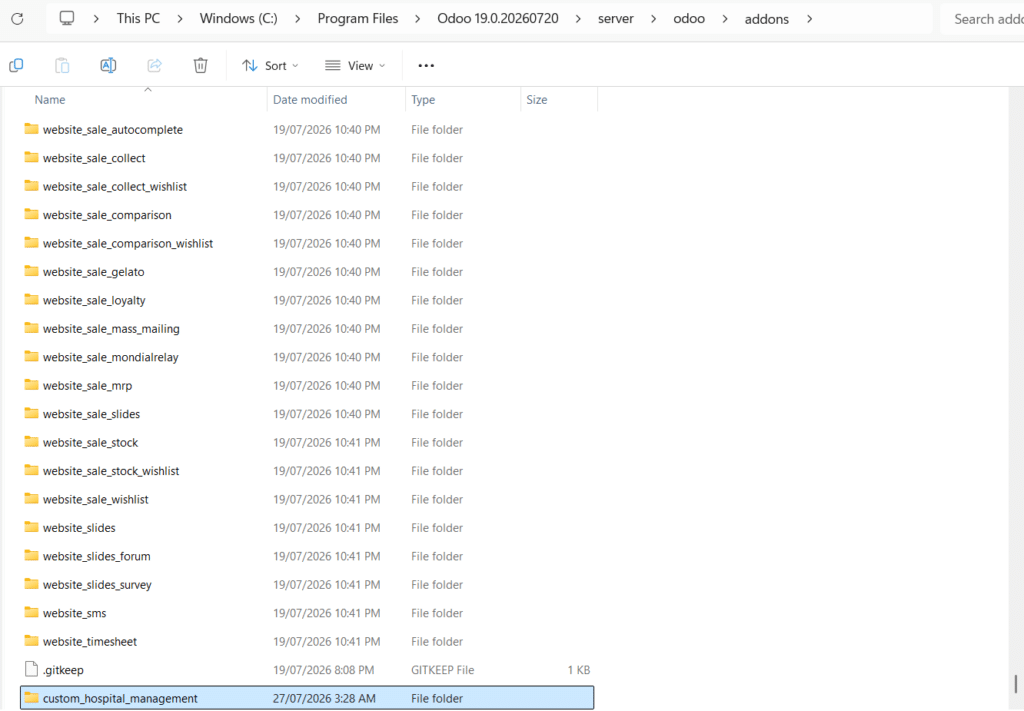
Step 1: Locate the custom-addons Directory in File Explorer
If you are running Odoo locally on Windows:
- Open File Explorer by pressing Ctrl + E.
- Navigate to your installation path (typically C:\Program Files\Odoo 19.0\server\odoo\addons or custom-addons).
- You can paste your folder path directly into the File Explorer address bar.
Crucial Rule on Folder Naming: Pick one clean, lowercase name for your custom module folder using underscores instead of spaces or hyphens (for example: custom_hospital_management or real_estate). Throughout this guide, we will strictly use custom_hospital_management across all code files, paths, and configurations.
Step 2: Create the Module Directory Structure
Inside your custom-addons directory, create a main folder named custom_hospital_management. Inside that main folder, create three sub-folders:
- models/ — Holds all Python files that construct database tables and business logic.
- views/ — Holds all XML files that render screens, forms, tables, and top navigation menus.
- security/ — Holds CSV files that grant users access permissions to your database tables.
Chapter 1: The Odoo Module Architecture
Every Odoo module is a self-contained directory containing Python code, XML layouts, and security rules.
Complete Directory Layout
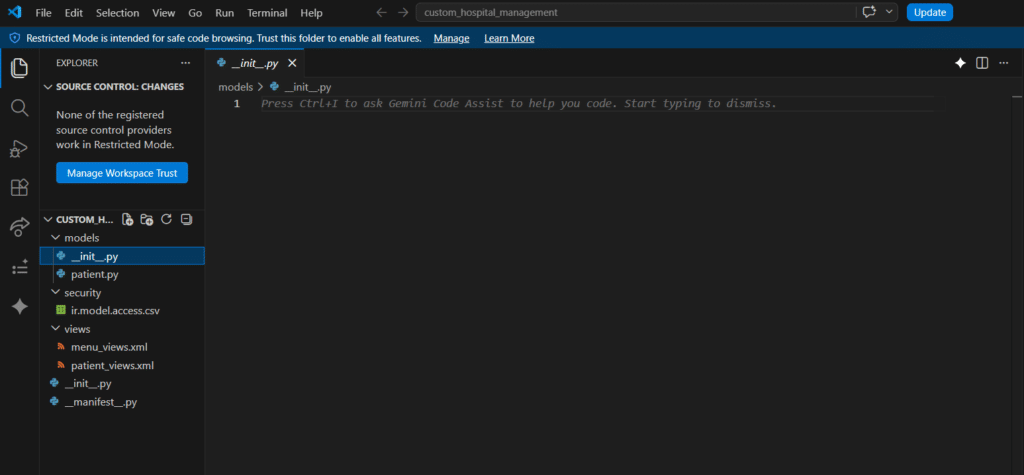
When viewed inside Visual Studio Code or File Explorer, your module structure must look like this:
Plaintext
custom_hospital_management/
│
├── __init__.py <– Root Python file initializing the module package
├── __manifest__.py <– Module configuration, metadata, and loading sequence
│
├── models/ <– Python database layer
│ ├── __init__.py <– Registers all model Python files
│ └── patient.py <– Patient database schema & logic
│
├── views/ <– XML user interface layer
│ ├── patient_views.xml <– Form and list (tree) view definitions
│ └── menu_views.xml <– Top menu navigation links
│
└── security/ <– Access control security layer
└── ir.model.access.csv <– Security rights (Read, Write, Create, Delete)
Chapter 2: Module Registration (__manifest__.py)
The __manifest__.py file tells Odoo what your app does, what base Odoo apps it depends on, and which data files to load into PostgreSQL.
When viewed inside Visual Studio Code or File Explorer, your module structure must look like this:
Manifest Configuration Code
File location: custom_hospital_management/__manifest__.py
Python
{
‘name’: ‘Hospital Management’,
‘version’: ‘1.0.0’,
‘summary’: ‘Manage patient records, appointments, and medical histories’,
‘category’: ‘Healthcare’,
‘author’: ‘Your Company Name’,
‘license’: ‘LGPL-3’,
# Dependencies: List official Odoo apps required before this module can be installed
‘depends’: [‘base’],
# Data Files: Must be listed in STRICT sequential dependency order
‘data’: [
‘security/ir.model.access.csv’, # 1. Security MUST load first
‘views/patient_views.xml’, # 2. Views and window actions MUST load second
‘views/menu_views.xml’, # 3. Menus referencing actions MUST load last
],
‘installable’: True,
‘application’: True, # Setting to True places this app on the main Odoo dashboard
}
Core Concept: Why Manifest Order Matters
Odoo executes files listed inside ‘data’: […] strictly from top to bottom:
- If views/menu_views.xml is placed above views/patient_views.xml, Odoo will crash with an External ID not found error because the menu will try to link to an action that hasn’t been created yet.
- Security files (ir.model.access.csv) must always sit at the top so permissions are active before screens are drawn.
Chapter 3: Creating Database Tables (Models & ORM Fields)
In Odoo, you do not write raw SQL statements (like CREATE TABLE). Instead, you define Python classes inheriting from models.Model. Odoo’s Object-Relational Mapping (ORM) creates and updates the underlying PostgreSQL database automatically.
Step 1: Register the Models Directory
File location: custom_hospital_management/__init__.py
Python
from . import models
File location: custom_hospital_management/models/__init__.py
Python
from . import patient
Step 2: Define the Model & Data Fields
File location: custom_hospital_management/models/patient.py
Python
from odoo import models, fields, api
class HospitalPatient(models.Model):
# Technical database table identifier created in PostgreSQL: “hospital_patient”
_name = ‘hospital.patient’
_description = ‘Hospital Patient Record’
# Standard Database Fields
name = fields.Char(string=’Full Name’, required=True)
age = fields.Integer(string=’Age’)
gender = fields.Selection([
(‘male’, ‘Male’),
(‘female’, ‘Female’),
(‘other’, ‘Other’),
], string=’Gender’, default=’male’)
note = fields.Text(string=’Medical History’)
active = fields.Boolean(string=’Active’, default=True)
# State tracking field for record lifecycles
state = fields.Selection([
(‘draft’, ‘Draft’),
(‘confirmed’, ‘Confirmed’),
(‘done’, ‘Done’),
(‘cancel’, ‘Cancelled’),
], string=’Status’, default=’draft’, required=True)
# Computed Field: Calculates values dynamically on the fly
is_minor = fields.Boolean(string=’Is Minor’, compute=’_compute_is_minor’)
@api.depends(‘age’)
def _compute_is_minor(self):
# ALWAYS loop over ‘self’ because Odoo handles records in batches (recordsets)
for record in self:
if record.age and record.age < 18:
record.is_minor = True
else:
record.is_minor = False
# Workflow Action Methods (Connected to UI Buttons)
def action_confirm(self):
for record in self:
record.state = ‘confirmed’
def action_done(self):
for record in self:
record.state = ‘done’
def action_cancel(self):
for record in self:
record.state = ‘cancel’
Core Concept: Key Naming Rules
- _name = ‘hospital.patient’: The technical ID for your model. Dots are automatically converted to underscores in SQL tables (hospital_patient).
- for record in self:: Never omit this loop inside compute methods or action buttons. Odoo passes lists of records (self); failing to loop will crash the system when performing bulk edits.
Chapter 4: Setting Up Access Rights (ir.model.access.csv)
By default, Odoo hides and blocks access to new database tables for security. You must explicitly define permission rules in your security file.
Permission Configuration Code
File location: custom_hospital_management/security/ir.model.access.csv
Code snippet
id,name,model_id:id,group_id:id,perm_read,perm_write,perm_create,perm_unlink
access_hospital_patient_user,access.hospital.patient.user,model_hospital_patient,base.group_user,1,1,1,1
Core Concept: The Model ID Rule
Look closely at column 3 (model_id:id):
- Take your model _name from Python: hospital.patient.
- Replace all dots with underscores: hospital_patient.
- Add model_ in front: model_hospital_patient.
The numbers 1,1,1,1 at the end grant Read, Write, Create, and Delete permissions respectively to standard internal users (base.group_user).
Chapter 5: Designing the User Interface (Views & Menus)
Odoo renders web views using XML. The two primary layouts are:
- Tree View (List View): Displays records in a multi-row table.
- Form View: Displays the detailed view when opening an individual record.
Step 1: Create Views & Window Actions
File location: custom_hospital_management/views/patient_views.xml
XML
<odoo>
<!– 1. Tree (List) View Definition –>
<record id=”view_hospital_patient_tree” model=”ir.ui.view”>
<field name=”name”>hospital.patient.tree</field>
<field name=”model”>hospital.patient</field>
<field name=”arch” type=”xml”>
<tree>
<field name=”name”/>
<field name=”age”/>
<field name=”gender”/>
<field name=”state”/>
<field name=”is_minor”/>
</tree>
</field>
</record>
<!– 2. Form View Definition –>
<record id=”view_hospital_patient_form” model=”ir.ui.view”>
<field name=”name”>hospital.patient.form</field>
<field name=”model”>hospital.patient</field>
<field name=”arch” type=”xml”>
<form>
<!– Workflow Header Buttons & Statusbar –>
<header>
<!– Modern Odoo 17+ invisible conditions –>
<button name=”action_confirm” string=”Confirm” type=”object” class=”oe_highlight” invisible=”state != ‘draft'”/>
<button name=”action_done” string=”Mark as Done” type=”object” class=”oe_highlight” invisible=”state != ‘confirmed'”/>
<button name=”action_cancel” string=”Cancel” type=”object” invisible=”state in (‘done’, ‘cancel’)”/>
<field name=”state” widget=”statusbar” statusbar_visible=”draft,confirmed,done”/>
</header>
<sheet>
<group>
<group>
<field name=”name”/>
<field name=”age”/>
<field name=”gender”/>
</group>
<group>
<field name=”is_minor”/>
<field name=”active”/>
</group>
</group>
<notebook>
<page string=”Medical History”>
<field name=”note”/>
</page>
</notebook>
</sheet>
</form>
</field>
</record>
<!– 3. Window Action: Instructions on what views to launch –>
<record id=”action_hospital_patient” model=”ir.actions.act_window”>
<field name=”name”>Patients</field>
<field name=”res_model”>hospital.patient</field>
<field name=”view_mode”>tree,form</field>
</record>
</odoo>
Step 2: Create Navigation Menus
File location: custom_hospital_management/views/menu_views.xml
XML
<odoo>
<!– Top-level Navigation App Icon –>
<menuitem id=”menu_hospital_root” name=”Hospital” sequence=”10″/>
<!– Sub-menu Category Dropdown –>
<menuitem id=”menu_hospital_patients_cat” name=”Patients” parent=”menu_hospital_root” sequence=”10″/>
<!– Action Link: Launches the window action defined in patient_views.xml –>
<menuitem id=”menu_hospital_patient_records” name=”All Patients” parent=”menu_hospital_patients_cat” action=”action_hospital_patient” sequence=”10″/>
</odoo>
Core Concept: Modern Button Conditions (invisible=)
In modern versions of Odoo (Odoo 17, 18, and 19), legacy states=”…” tags on form buttons are deprecated. Use the invisible domain condition:
- invisible=”state != ‘draft'” hides the button whenever the state is not draft.
- invisible=”state in (‘done’, ‘cancel’)” hides the button if the record reaches completion or cancellation.
Chapter 6: Extending Native Odoo Apps (_inherit)
Most real-world projects involve modifying standard Odoo apps (like adding custom fields to Sales Orders or Customer records). This is done using inheritance.
Step 1: Python Extension
File location: custom_hospital_management/models/sale_order_inherit.py
Python
from odoo import models, fields
class SaleOrder(models.Model):
# _inherit tells Odoo to modify the existing ‘sale.order’ table instead of creating a new one
_inherit = ‘sale.order’
driver_notes = fields.Char(string=’Delivery Instructions’)
Step 2: XML UI Extension (<xpath>)
File location: custom_hospital_management/views/sale_order_views.xml
XML
<odoo>
<record id=”view_order_form_inherit” model=”ir.ui.view”>
<field name=”name”>sale.order.form.inherit</field>
<field name=”model”>sale.order</field>
<field name=”inherit_id” ref=”sale.view_order_form”/>
<field name=”arch” type=”xml”>
<!– Target the existing payment_term_id field and insert driver_notes directly below it –>
<xpath expr=”//field[@name=’payment_term_id’]” position=”after”>
<field name=”driver_notes”/>
</xpath>
</field>
</record>
</odoo>
Chapter 7: Updating & Deploying Custom Changes
Whenever you modify .py files or .xml layout files, follow these steps to load the updates into Odoo:
- Restart the Server Service:
- Windows: Press Ctrl + Shift + Esc (Task Manager) ➔ Services tab ➔ Right-click odoo-server ➔ Restart.
- Linux: Run sudo systemctl restart odoo in your terminal.
2.Upgrade the Module in Odoo:
- Activate Developer Mode in Odoo (Settings ➔ scroll down and click Activate the developer mode).
- Go to the Apps menu ➔ click Update Apps List in the top navigation bar.
- Search for Hospital Management (or custom_hospital_management) and click Activate (or Upgrade).
Chapter 8: Fast CLI Terminal Commands
Instead of using the Odoo web UI to upgrade your module every time you edit code, run this terminal command to force Odoo to auto-upgrade your app on launch:
Terminal Command Syntax
- Windows Command Prompt:
- DOS
python odoo-bin -c odoo.conf -d your_database_name -u custom_hospital_management –dev=xml
- Linux / Mac Terminal:
- Bash
./odoo-bin -c /etc/odoo/odoo.conf -d your_database_name -u custom_hospital_management –dev=xml
Flag Reference
- -d <db_name>: Specifies your active PostgreSQL database name.
- -u <module_name>: (Update Flag) Forces an immediate upgrade of your custom module on boot.
- –dev=xml: Allows live XML reloads—saving an XML file instantly updates the page on browser refresh without restarting the server.
Chapter 9: Common Errors & Troubleshooting
Error Message / Issue | Primary Cause | How to Fix |
ParseError: External ID not found | XML/CSV files are listed in the wrong order inside __manifest__.py. | Reorder ‘data’: […] in __manifest__.py. Security files must be listed before views, and actions before menus. |
AccessError: You are not allowed to modify… | Missing entry inside ir.model.access.csv or incorrect model ID syntax. | Verify ir.model.access.csv. Ensure column 3 follows the pattern model_your_model_name. |
AttributeError: ‘hospital.patient’ object has no attribute ‘x’ | Python code was edited, but the Odoo server service hasn’t reloaded yet. | Restart the Odoo service and upgrade your module via the Apps menu or terminal. |
XML Validation Error (states=) | Using legacy Odoo 16 or earlier syntax for buttons on newer Odoo versions. | Replace states=”draft” with invisible=”state != ‘draft'” in your button XML. |
Chapter 10: One-Page Developer Cheat Sheet
Directory Reference
Plaintext
custom_hospital_management/
├── __init__.py <– Root import: from . import models
├── __manifest__.py <– Load order & dependencies
├── models/
│ ├── __init__.py <– Model import: from . import patient
│ └── patient.py <– Schema & Python logic
├── views/
│ ├── patient_views.xml <– Form & Tree XML layouts
│ └── menu_views.xml <– Navigation menu XML
└── security/
└── ir.model.access.csv <– CRUD Permissions
Essential ORM Fields
Field Type | Python Example | Usage |
Char | name = fields.Char(string=’Name’, required=True) | Single line text |
Text | notes = fields.Text(string=’Notes’) | Multi-line text box |
Integer | age = fields.Integer(string=’Age’) | Whole numbers |
Selection | gender = fields.Selection([(‘m’, ‘Male’), (‘f’, ‘Female’)]) | Dropdown list |
Boolean | active = fields.Boolean(string=’Active’, default=True) | Checkbox |
Many2one | partner_id = fields.Many2one(‘res.partner’, string=’Customer’) | Foreign key link |
Core Developer Rules
- Manifest File Sequence: Security CSV first, Views second, Menus last.
- Security ID Mapping: Model hospital.patient ➔ CSV ID model_hospital_patient.
- Recordset Loops: Always wrap computed logic in for record in self:.